Pages

Monday, January 31, 2011

Easy, Overnight Steel Cut Oatmeal

Whenever I think of oatmeal, I think of my good friend, Dan. We used to work together a number of years ago (which we like to refer to as "the good old days") and he actually loves food as much as I do. It became a sort of tie that binded, if you will. But he was also committed to taking care of his body (me, not as much), so every morning, he would go to the break room, heat up his quick oats (with no need to measure the water - he could eyeball it perfectly), and then eat it with just a big sprinkling of cinnamon on top. Every morning.

When it came time for Dan to move on to a different position, one of his biggest sources of angst was that there was nowhere for him to make his oatmeal breakfast in the morning. If only Dan had this steel cut oats recipe, he could have his breakfast ready for him when he left in the morning. Danny - this one's for you! :)

If you're not familiar with steel cut oats (also known as Irish Oats), you are not alone. I had made quick oats, old fashioned oats, and the packets of instant oats, but the only steel cut oats I've had came in those lovely freezer pouches from Trader Joe's. They were tasty, but not exactly cheap.

If you haven't tried steel cut oats, they are delicious and just about the healthiest breakfast you can have. They are also my new favorite oatmeal variety. Want to learn more about the benefits of oats, check out this site.

If you have tried them, but decided they were too messy to clean up or took to long to cook, I offer you this super easy overnight preparation using your crock pot/slow cooker.

First, find a bowl that:
1. Holds four cups of liquid
2. Fits inside your crock pot with the lid on
3. Is oven-safe

Next, place a couple foil balls in the bottom of your crock pot to allow water under your bowl. Update: My sister-in-law uses the rim of a canning jar lid in place of the foil balls, which is much easier, stable, and a bit more eco-friendly. It's a great idea that I'll be using too. This is supposed to remove any risk of the main crock pot bowl cracking due to lack of water between the two bowls. In all my research on this method, I have yet to read one complaint of a cracked bowl, but I'm not one to risk it, so I add the foil balls.

Stick the bowl on top of the foil balls, then add some water to the crock pot to make sure that everything is stable. I used the water filtered from our fridge to reduce any hard water ring that could be left on the crock pot. I didn't end up with a ring at all, but I'm pretty sure our tap water would have left one I would've had to scrub. After your bowl has been stabilized, add 1 c. steel cut oats to the bowl.

Top it with about 4 c. water. (And a dash of salt, if you are so inclined. I did not and they were just fine.) Using a measuring cup, fill the water in the main crock pot to at or just above the level of water in the oatmeal bowl, creating a double boiler effect. Put the lid on your crock pot, set the timer to low and go to bed.

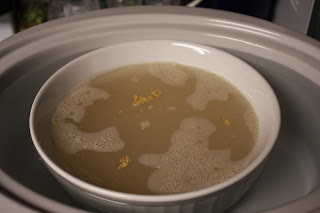
The oats cooked for about 8 hours and this is what I woke up to in the morning.

I pulled off the lid and was a little concerned that there was water that didn't absorb. Turns out, this wasn't an issue at all.

Gave them a quick stir. Notice that there is nothing stuck to the sides of anything. Success! Clean up is easy.

I like mine with some brown sugar and milk and they were PERFECT. I actually forgot to take a picture until I was almost half done with my bowl. Oops.
Some topping ideas include (but are not limited to):
  • Cinnamon (aka "The Dan")
  • Brown Sugar
  • Milk
  • Honey
  • Maple Syrup
  • Craisins
  • Raisins
  • Dried Currants
  • Pecans (Candied would be yummy)
  • Walnuts
  • Diced Apples
  • Butter
  • Pumpkin Pie Spice
  • Unsweetened Applesauce
  • Sliced Banana
  • (Fresh or Frozen) Strawberries
  • (Fresh or Frozen) Blueberries
Or if you are looking for something a little more dessert-like for breakfast, check out this recipe for Banana Split Oatmeal.

The recipe serves 4, but as I'm the only one who eats oatmeal in my house, I've just been spooning some out of the bowl every morning and reheating it for a couple of minutes in the microwave with some milk. Now that's my kind of breakfast.

Overnight Steel Cut Oatmeal
Serves: 4

Ingredients:
  • 1 c. steel cut oats (also known as Irish Oats)
  • 4 c. water
  • Dash of salt (optional)
Using the steps listed above, create a double boiler in your crock pot/slow cooker. Add the oats, water, and optional salt to the smaller bowl and give it a stir. Place the lid on the crock pot, set the crock pot to low, and cook for 7 - 9 hours. Add preferred toppings and enjoy!

Source: Ann Kroeker

Wednesday, January 26, 2011

Ravioli "Lasagna"

The name is a bit of a misnomer. This is not a traditional lasagna, but really more of a ravioli bake. But then again, it tastes a bit like lasagna, and if you let it rest for 15 minutes before cutting into it, it kinda looks like lasagna too. However, this is so much faster and cheaper than lasagna. Want to see what I mean? All the ingredients are shown below: (*I did end up using 1.5 jars of Prego Traditional Sauce because I didn't think there was quite enough sauce for my liking)

How awesome is that? Then you layer it. A little sauce on the bottom, then place the ravioli on top, side by side, but not overly crowded. The recipe states to do it in a 9"x13" pan, but I really like my 10"x10".

Spoon and spread more sauce on top of the frozen ravioli. 

Top it with a couple handfuls of shredded mozzarella cheese and repeat until you have used up all the ravioli. I was just shy of 3 layers by 4 raviolis. If you have a couple that are stuck together, throw them in the microwave for 10 sec. to soften enough to pull apart. Don't attempt to spear them apart with a fork. It doesn't end well.

Bake at 350° for 30 minutes or until bubbly.

Let rest for 15 minutes and yours will cut much prettier than mine did:
Serve along side a salad and garlic bread and a cheap and easy (but still yummy) pantry dinner is served.

Ravioli "Lasagna"
Serves: 6-8
Ingredients:

  • 1 (25 ounce) package frozen cheese ravioli
  • 1 and ½ (26 1/2 ounce) bottles of spaghetti sauce 
  • 2 1/2 cups mozzarella cheese, shredded
In 9x13-inch dish, spread a little bit of sauce at bottom (to prevent sticking). Put on ravioli, as many as will fit without being"tight". Put on more sauce and then cheese. Repeat until all ravioli is gone. Bake at 375 for 25-30 minutes. (I usually have three layers of about 15 ravioli in each layer.) Let stand for 15 minutes before cutting.

Source: My friend Jo, and food.com 

Monday, January 24, 2011

Meyer Lemonade

It's the dead of winter and here I am making lemonade. You know what they say, "If the store is selling cheap lemons, make lemonade." Or something like that...

Meyer lemons are a sort of cross between lemons and oranges. They are usually pricier, but Kroger had bags of them 4 for $5, so I of course had to buy several bags! I've read on other blogs that Meyer lemons make delicious lemonade, so here we are - lemonade in January.

Don't let your grocer's lack (or price) of Meyer lemons deter you. Homemade lemonade is easy, with or without a crazy (yet delicious) hybrid fruit.

It starts out with a simple syrup, which is really just equal parts water and sugar heated on the stove top just until the sugar dissolves. For this recipe, I used 1 c. sugar and 1 c. water. over medium low heat.

My cheap bag 'o lemons.

Make sure you wash them, even though you're only using the juice. 

Cut up 9 - 10 lemons.

Juice those beauties. I originally juiced only 6 lemons, but I ended up using 10 because Meyer lemons are a bit sweeter than the traditional lemon and I did not take that into consideration when adding my simple syrup. It ended up being just shy of 14 oz. of juice.

Pour the juice into a pitcher, and learn from my mistake. Add 4 c. of cold water to the lemon juice and add your simple syrup to taste. Very important so you don't have to continue juicing lemons.

Pour yourself a nice, refreshing glass of lemonade and remind yourself that summer will be here before you know it.

Meyer Lemonade
Serves: 4-6

Ingredients:
  • Juice of 9-10 Meyer Lemons (or regular lemons)
  • Simple Syrup (1 c. sugar and 1 c. water)
  • 4 c. cold water
To make simple syrup: Heat 1 c. sugar and 1 c. water over medium-low heat, just until sugar dissolves. Remove from the heat and let cool.

Wash and juice lemons. Pour lemon juice into pitcher, add 4 c. of cold water, and add in the simple syrup to taste.

Friday, January 21, 2011

"Overachiever" Mocha Cookies


As mentioned in a previous post, some very good friends of ours recently had a baby. When trying to figure out what to bring for dinner, I came across a recipe in The Gourmet Cookie Book for mocha cookies and thought what could be better to help them stay awake than caffeine delivered via chocolate cookie? The mocha flavor comes from the espresso powder listed in the recipe, but me being me, I couldn't stop there. I remembered I had some espresso-bean chocolate I had picked up at a local store, so I decided to amp-up the caffeine quotient by using that in place of the chocolate chips.

My husband called while I was in the middle of chopping up my own chocolate chunks, and after explaining what I was doing, he said I was an overachiever. I would normally have scoffed at such a pronouncement, but about two-thirds of the way through the chopping process, I had to agree. You do not need to do all the chopping that I did and actually, I think these would've tasted a bit better if the texture of the cookie didn't include all those tiny espresso bean pieces that were in the chocolate bars I used.

Here's what I did: (While the process may seem long, it really didn't take that long. I think I had the batter put together in about 25 minutes, and this was with my carefully chopping up 4 chocolate bars and another 4 oz. chocolate)

Start by chopping up 4 oz. unsweetened chocolate:

Here's the overachiever part of the recipe. I needed 1½ c. of semisweet chocolate to be added to the double boiler (shown below), and 1½ c. to be chopped up and added to the batter later. I ended up using all 4 bars of chocolate to get the 3 c. of chocolate. Mini chocolate chips would have worked really well in place of the chocolate chunks that I made.

Add the 4 oz. of unsweetened chocolate, 1½ c. chocolate chips (or chopped up chocolate) and a stick of unsalted butter to the double boiler. Make sure you start out with a completely dry pot. Any water can cause your chocolate to seize, which pretty much destroys it.

While your chocolate is melting, get 4 eggs and 1½ c. sugar and beat it until it's very pale and thick.

The recipe uses only a bit of flour, mixed with baking powder and salt. Combine these while your eggs are beating.

Still beating. It takes at least a good 5 minutes of medium-high beating to get it really nice and thick.

Looks pretty good.

Add in the vanilla and espresso (or instant coffee) powder.

Fold in the chocolate mixture (from the double boiler), then the flour mixture. If you're unsure of what folding is, or how to fold, click here.

Stir in the remaining 1½ c. of chocolate chips and allow the batter to rest for 15 minutes. The batter can also be placed into the fridge for baking later. (This is about half of the total batter.)

Drop a heaping tablespoon on a parchment lined baking sheet and bake at 350° for about 10 minutes.


Very tasty hot out of the oven, but also will last for several days in an airtight container. These are extremely chocolaty, so if you love chocolate, make them. If you tolerate chocolate, try a chocolate chip cookie instead.

Mocha Cookies
Yields: ~3 dozen cookies


Ingredients:
  • 4 ounces unsweetened chocolate, chopped
  • 3 cups semisweet chocolate chips (mini would work very well)
  • 1 stick (½ cup) unsalted butter, cut into bits
  • ½ cup all-purpose flour
  • ½ teaspoon double-acting baking powder
  • ½ teaspoon salt
  • 4 large eggs, at room temperature
  • 1½ cups sugar
  • 1½ tablespoons instant espresso powder
  • 2 teaspoons vanilla
In a metal bowl set over a saucepan of simmering water, melt the unsweetened chocolate, 1½ cups of the chocolate chips, and the butter, stirring until the mixture is smooth, and remove the bowl from the heat. In a small bowl, stir together the flour, the baking powder, and the salt. In a bowl, beat the eggs with the sugar until the mixture is thick and pale, and beat in the espresso powder and the vanilla. Fold the chocolate mixture into the egg mixture, fold in the flour mixture, and stir in the remaining 1½ cups chocolate chips. Let the batter stand for 15 minutes.

Drop the batter by heaping tablespoons onto baking sheets lined with parchment paper and bake the cookies in the middle of a preheated 350ºF oven for 9 to 11 minutes, or until they are puffed and shiny and cracked on top. Let the cookies cool on the baking sheets, transfer them to racks, and let them cool completely.


Source: The Gourmet Cookie Book

Thursday, January 20, 2011

Roasted Cauliflower


Cauliflower and I have a history. When I was 6 or 7 years old, I remember standing in my grandma's kitchen wondering what she was working on. She handed me this little hard, white vegetable to try... Now I loved my grandma so much and could never hurt her feelings or feel that I had disappointed her, but as soon as that cauliflower floret hit my tongue, I snuck out of the kitchen and practically ran to the bathroom. I promptly removed it from my mouth, and wrapped it in about 45 squares of toilet paper, then buried it in the bottom of the trash can. I remember telling her that I thought it was good, but that I didn't want anymore. I don't know to this day if she ever knew that I actually hated that taste of raw cauliflower, but it was a nice realization a couple years later that her love for me wasn't based on whether or not I liked a particular food. :)

I see that same kind of mentality in my oldest daughter, so it's been helpful to reinforce that it's okay to be who she is and love what she loves, while still keeping an open mind to trying things she doesn't love, and knowing it's okay that she doesn't love them. She definitely already understands that tastes can and do change, and that's something that I'm pretty proud of. I think my grandma would be proud, too.

Even if you are not traditionally a fan of cauliflower, hear me out. Roasting is this little trick that changes ingredients into something completely amazing. Even cauliflower. And while it may sound complicated, it is really, truly not. You throw veggies on a pan, add salt and pepper, some oil (olive, vegetable, whatever you have on hand), toss it together and throw it into a hot oven (stirring occasionally) for about 25 minutes. If you are cooking your dinner at a lower temp, then just cook them a little bit longer. Super versatile and delicious - one of my favorite combinations!

Cauliflower, olive oil, salt, pepper, and about 15 cloves of garlic (they are also yummy after roasting):

After about 6 or 7 minutes, I pulled them out and gave them a quick stir:

The finished (and über delicious) final product:
My youngest liked it. The oldest, well, not so much. But that's okay... she may in a couple years.

Roasted Cauliflower
Serves: 4

Ingredients:
  • 1 whole Cauliflower
  • 20 cloves Garlic (optional)
  • 1 Tbsp. Olive Oil (or Canola - whatever you have on hand)
  • Salt And Pepper, to taste
Preheat over to 450. Wash and cut the cauliflower into bite sized pieces. Peel the garlic, if using. Toss the cauliflower (and garlic) in the oil. Sprinkle with salt and pepper. Roast in a shallow pan or baking sheet (I use a jellyroll pan) for about 25 minutes. Be sure to give your veggies a stir every once in a while.


Source: Loosely adapted from Tasty Kitchen

Wednesday, January 19, 2011

Oprah's "Love Sandwich" (Turkey & Cheese Panini)


Busy, busy, busy. 2011 has started out with a flurry of activity and has left not a lot of time for blogging. Sorry about that. I'll do better. Next week. :)

Some good friends came over for dinner and I wanted to give my new Cuisinart Griddler (a Christmas gift from my hubby) a try. We had used it to make grilled cheese last week but without having sturdy bread, it didn't go so well. This time, I came armed with a recipe and read the instruction manual. (Does anyone else hate reading instructions? I save it for after I have already failed.)

I remembered seeing Oprah boast about this sandwich she makes for her longtime love using a Panini maker. She called it her "Love Sandwich". It's pretty much a turkey and cheese on sourdough with mayo and basil. Easy enough. So I set to work...

Lightly olive oil some sourdough bread. The first time I made these sandwiches, I used a silicone basting brush. The second time, I remembered I had a Misto that would do this for me with the push of a button. If you have a Misto, this is a great time to use it. If not, you can easily just brush some olive oil on.

I placed the olive-oiled sides facing each other. This kept my board oil free (although it really could use some oil... Hmm...), and allowed me to start topping the bread. Add a thin layer of mayonnaise to the bread. While I usually do not add mayo to my sandwiches, I did this time and I'm glad I did. It definitely helped keep the sandwich moist. The recipe instructs to mayonnaise both sides of the bread, but just one side tasted just fine to me.

Next up, pepper jack cheese. The deli made some huge slices, so we just halved them.

Place the pepper jack on the mayonnaised slice of bread, top it with turkey and some fresh basil, then the other half (or another slice) of pepper jack. In all honesty, I wasn't sure about the basil at first and considered leaving it out, but it turns out that the basil really makes the sandwich. It imparts a very nice freshness and almost peppery flavor that it would be sorely lacking without it. I used two leaves the first time I made it, and decided I liked it so much that I wanted more this time. You can start out with two leaves.

Toss it in a preheated panini maker. Don't have a panini maker? No worries. Throw it in a skillet, and put another heavy skillet on top. Flip it over to toast the other side, and you have pretty much the exact same sandwich. We're an equal opportunity cooking blog.

The benefit of the panini maker is no need to flip and pretty lines. 

 Mmmm.... melted cheesy goodness.
The verdict: All in all, a tasty sandwich. I enjoyed the creaminess of the jack cheese, and the basil really does make this sandwich something special. I do, however, believe a nice pesto would make this sandwich as good, but probably even better. 


Oprah's Love Sandwich
Serves: 1
  • 2 slices sourdough sandwich bread
  • Olive oil for brushing
  • 1 teaspoon light mayonnaise
  • 3 ounces thinly sliced turkey
  • 2 ounces thinly sliced pepper jack cheese
  • 2 basil leaves
Preheat an electric panini press to medium-high heat according to the manufacturer's instructions. If using a skillet, preheat a skillet over medium-high heat.

Brush one side of the bread slices with olive oil. Lay the slices, oiled side down, on a clean work surface and brush the tops of each slice with 1 teaspoon light mayonnaise. Place 1 1/2 oz. turkey and 1 oz. cheese and basil leaves on one of the slices of bread. Top the remaining turkey and cheese onto the other slice of bread.

Place the sandwich on the preheated panini press and cook according to the manufacturers instructions until crispy and dark golden brown, 3 to 5 minutes. If making the sandwich on the stove top, place the sandwich in the pan and place a heavy pan on top of the sandwich to gently put weight on it. Once crispy and golden, flip and repeat with the other side.

Transfer the sandwich onto a cutting board.

Source: Oprah.com

Wednesday, January 12, 2011

Pizza Bites

I'm a little behind in my blogging. Turns out cleaning out my house has taken the front seat while pretty much everything else has kind of taken a back seat. I have, however, been photographing the yummy (and the sometimes mediocre) food we've been making, so you'll see it - eventually. ;)

These pizza bites were the last of the snacks we brought to the New Year's Eve party. While they were good, they didn't shine quite as bright as the other goodies we brought. They are pretty basic enough - pizza dough, wrapped around mozzarella cheese and pepperoni, then topped with Italian seasoning, olive oil, and Parmesan cheese and baked till golden, with a bowl of pizza or marinara sauce on the side, of course.

And they were good. About what you would expect. But as my husband and I were talking about them the next day, we both felt they were just missing something. And then he said it.

"Garlic butter basted on top after they come out of the oven."

Trumpets sounded and a heavenly chorus sang. This is most definitely what would have moved these from good to spectacular.

The next time I make these, they will be slathered in garlic butter. Amen.

Ready to pop in the oven:

The finished product.
Pizza Bites
Makes ~48 bites
Ingredients
  • 2 recipes or balls pizza dough (or 2 cans refrigerated pizza dough) {I used Trader Joe's pre-made pizza dough}
  • 8 oz. block mozzarella cheese {I used Trader Joe's Real Mozzarella sticks, each stick sliced into 6 pieces}
  • 4 oz. thin sliced pepperoni
  • 2 tsp. Italian seasoning (combine oregano, basil, parsley, and garlic)
  • 1/4 cup olive oil
  • 3 Tbsp. grated Parmesan cheese
  • Pizza or marinara sauce
  1. Prepare pizza dough. Cut block of mozzarella into 48 cubes.
  2. If you are going to bake some (or all!) right away preheat oven to 400°F. Grease 3 pie pans.
  3. If using refrigerated pizza dough: roll one dough out into a large rectangle and cut into 24 pieces. Repeat with 2nd pizza dough. If using homemade dough just pinch off walnut sized pieces as you go.
  4. In each dough piece place a couple pieces of pepperoni and a cube of cheese. Seal dough around meat and cheese and place seam side down in pie pan.
  5. Repeat, placing approximately 16 dough balls in each pie plate.
  6. Once assembled, combine oil and spices and brush over the dough. Sprinkle with Parmesan cheese.
  7. Now you can cover with plastic wrap and refrigerate or freeze or you can bake right away.
  8. When ready to bake: bake at 400°F for 16-20 min. Serve with warm pizza or marinara sauce.